An Introduction to Programming with Karel J. Robot
Programming with Karel J Robot - Part 1 of 4
Computer programming is an absorbing and challenging hobby and a valuable occupational skill. It helps develop many useful intellectual abilities, including analytical thinking, creativity, and problem-solving. But most importantly, computer programming is fun.
Welcome to the first in a series of articles intended for people with a moderate level of computer experience but little or no knowledge of programming. Let’s say you know what files and folders are, you can use a word processor, you don’t need detailed instructions on how to install software, and if I say “Run Program X” you’ve got a pretty good idea where Program X is and how to get it going. That’s all you need - no expertise required.
This is an introduction to computer programming, specifically object-oriented programming in the Java programming language. In the example programs and exercises you will program a robot to carry out various tasks. Although it is possible to do all of the programming exercises on paper (writing programs out and “running” them by hand), it is more fun to use a robot simulator on your computer. I will assume that you have installed the Karel J. Robot simulator - see Cooking up a programming environment for more information.
In this article we will learn about the robot world, cover the basics of programming a robot, and get you started on your own programming tasks.
Get to know your Robot
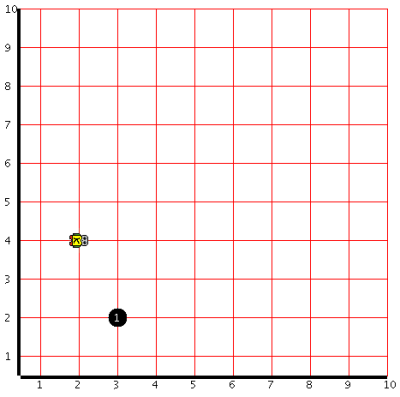
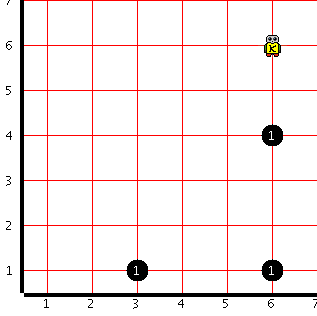
Meet Karel J. Robot. Karel and the other robots like it exist in a flat world of avenues (running north-south) and streets (running east-west), making a grid with intersections as illustrated in Figure 1. Note that the streets and avenues are numbered so it is possible to identify an intersection by the street and avenue number. An impenetrable wall runs along the robot world to the west and south, otherwise robots may wander the streets and avenues.
Figure 1 - Karel’s World
Robot Abilities
A robot is able move in the direction it is facing. Each time it moves, a robot moves from one intersection to the next - the length of exactly one block. For example, if a robot is facing north (towards the top of the screen) at the corner of 4th Avenue and 2nd Street and it is told to move, it will move to the corner of 4th Avenue and 3rd Street.
A robot can also turn 90 degrees at a time, allowing it to face the four major compass points: north, south, east, and west. But is is not able to turn to the points in between - for instance it can’t face south-east. When it turns a robot stays at the same location. For example if a robot is facing north at the corner of 4th Avenue and 3rd Street and it is told to turn left, it will turn to face west but will stay standing at the corner of 4th Avenue and 3rd Street.
A robot can also manipulate objects called “beepers”. Beepers are small plastic discs that emit a soft beep. If there are any beepers in the same location as the robot, it can detect the beeping. A robot can pick up a beeper if there is at least one at the intersection where it stands. A robot can put down a beeper if it is carrying at least one beeper.
Setting Tasks for a Robot
With these abilities available, we can program a robot to carry out tasks in the robot world. Let’s have a look at a robot task written in the Java language:
Listing 1 - a robot task
1.  Robot karel = new Robot(1, 2, East, 3);
2.  karel.move();
3.  karel.putBeeper();
4.  karel.move();
5.  karel.move();
6.  karel.move();
7.  karel.turnLeft();
8.  karel.putBeeper();
9.  karel.move();
10. karel.move();
11. karel.move();
12. karel.putBeeper();
13. karel.move();
14. karel.move();
Notice that each command ends with a semicolon. This is part of the syntax of Java and it means “the current command ends here, anything after this belongs to the next command”.
Let’s look at the task line by line.
The first line makes a robot and positions it in the robot world. We need to read it back to front as follows:
new Robot- means make a new robot(1, 2, East, 3)- put the new robot at the corner of 1st Avenue and 2nd Street, make it face east, and give it 3 beepers to carryRobot karel =- name the new robot “karel”. The equals sign is used to assign the name karel to the new robot that we have requested. Note that the name karel can only refer to a robot because it has the “Robot” prefix. This means that in this task we can’t make a non-robot object, say a bicycle, and call it karel - karel can only be a robot.
At line 2 we get our robot to move one space in the direction it is facing. Notice that we give the robot a command by using its name, putting in a dot, then adding an instruction. In this case it’s like saying in English “Karel, move”.
In normal English, line 3 means “Karel, put down a beeper here.”
In lines 4, 5, and 6 karel is told to move.
At line 7 the robot is told to turn exactly 90 degrees to its left. It has not moved from where it was at the end of line 6, but it is now facing in a new direction.
Hopefully you can follow the pattern of the remaining commands. Before you go any further, try to work out what the robot does in this task. It will be easier if you sketch it out on a piece of paper.
Rev it up
To run this task as a program, follow these steps:
1 Start up BlueJ
2 Load the project “example01″ from your working folder (choose Project Open Project… and move to your working folder). You should see a screen similar to this:
Figure 2 - The BlueJ project window
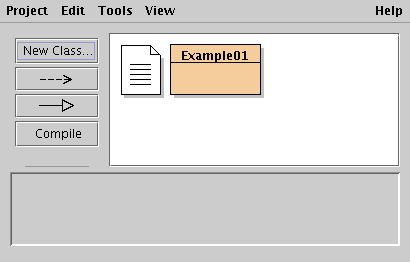
3 Right-click on the box labeled “Example01″ and choose the option “new Example01()”, which opens a box like this:
Figure 3 - Creating a new Example01.
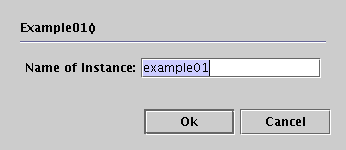
4 Change the “Name of Instance” field to “test” and click “OK”.
Figure 4 - note the new “test” box at the bottom of the screen.
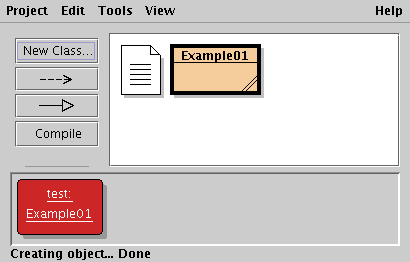
5 Right-click on the “test” box and the second option is “void task()” - this is our robot’s task, so click this and see what happens.
A window opens to display the robot world and another opens to display a “trace” of the program status. If your screen is like mine the trace window will overlap the robot world window, so just click on the title bar of the latter so you can watch the robot move.
Figure 5 - Karel’s first task.
Have a look at the trace output and compare it with Listing 1. Notice that as each line in Listing 1 is executed the robot does something and the result of that action appears as an entry in the trace. This is an important point - computers do things very quickly but they only do one thing at a time, so each command builds on the result of the previous command.
Peek under the hood
Now that we’ve seen the robot in action, let’s look at the code.
Close down the robot world and trace windows and return to the project window in BlueJ. Double-click on the “Example01″ box and the edit window opens showing the code in Listing 2. (This code is available for download.)
Listing 2 - The whole program
import kareltherobot.*;

public class Example01 implements RobotTask
{
  public void task()
  {
    World.reset();
    World.setTrace(true);
    World.setVisible(true);
    Robot karel = new Robot(1, 2, East, 3);
    karel.move();
    karel.putBeeper();
    karel.move();
    karel.move();
    karel.move();
    karel.turnLeft();
    karel.putBeeper();
    karel.move();
    karel.move();
    karel.move();
    karel.putBeeper();
    karel.move();
    karel.move();
  }
}
This is the “source” code for the scenario we’ve just watched the robot acting out. Most of it will be familiar to you from the robot task instructions in Listing 1, but there is some new stuff there:
- The first line isn’t actually part of the program, rather it makes sure that all of the information about robots is available to the program. Details about how to make a robot and what a robot can do are stored in a special package called “kareltherobot”, so we need to “import” it into our program.
- The next line indicates that this is a program that describes a task that we want to give to a robot (a “RobotTask”). This is also where the program is named and (with more devastating originality) I have decided to call it “Example01″.
- The actual Example01 program starts on the next line with the left hand curly bracket {, and the end of the program is marked by the matching right hand curly bracket } on the last line.
- The command
public void task()indicates the start of the robot’s task. The commands that make up the task are contained in another matching set of curly brackets {}. - The first three commands of the robot task do some housekeeping:
World.reset()clears everything off the robot world (a bit like clearing all of the playing pieces off a game board before starting a new game),World.setVisible(true)displays the robot world, andWorld.setTrace(true)makes the trace window visible.
The remaining commands have already been discussed above.
Fiddle with the engine
I get a bit frustrated by that trace window popping up in front of the robot world. So let’s get rid of it.
Change the line World.setTrace(true); to read World.setTrace(false); and click the Compile button. Watch the status bar at the bottom of the window and the message “Class compiled - no syntax errors” should soon appear.
Return to the BlueJ project window and you’ll notice that the “test” object is no longer available. Because the source code has changed, the “test” object is no longer valid. So to make a new one go through this dance again:
- Right-click on “Example01″ and choose the option “new Example01()”.
- Change the “Name of Instance” field to “test” and click “OK”.
- Right-click on the “test” box and select the “void task()” option.
Look Mum - no trace!
Indulge your inner vandal
Let’s do some deliberate damage and see how well the robot copes.
Double-click on the Example01 box to open the editor window. Now remove the semicolon from the end of the World.reset() command - remember that a semicolon is used to indicate where one command ends and another begins, so without one on the end of this command we have made a syntax error. Click Compile and notice the next line gets highlighted and the status bar says “‘;’ expected”. The compiler has noticed something fishy here and has put the highlight roughly near the trouble spot. Replace the semicolon and compile again - there should be no problems this time.
Change the command karel.turnLeft(); to karel.turnRight(); and click Compile. This time the editor highlights the trouble spot exactly and the status line says “cannot resolve symbol - method turnRight”. The compiler doesn’t recognise the word “turnRight”. That seems very odd, but it’s correct - there is no command to make the robot turn to the right! So this is another syntax error. (By the way, why don’t robots need a turnRight() command? See “A harder task” below for a clue.)
Restore the karel.turnLeft() command, then in the command Robot karel = new Robot(1, 2, East, 3); change “East” to “North”. Try to compile it - hey, no errors! Close the editor window, make a new Example01 object in the main window, then right-click and select void task(). This time the robot starts moving north, places two beepers and — smacks into a wall! The trace window appears and says that an “Error shutoff” has occurred.
Why did the compiler let this error through? Remember that computers are incredibly stupid - they can’t work out what you’re trying to do. As long as the syntax of your commands are legal, your program will compile. This is not an error of syntax - all of the commands are legal and the grammar is correct. The error was in the meaning of the commands. Such errors are commonly known as run-time errors because they only appear when you run the program. Compilers can not detect run-time errors.
Open up the editor again and alter the same line so that it reads Robot karel = new Robot(1, 2, East, 1);. This time the robot is facing east so it won’t run into a wall and everything should be fine. What else could go wrong? To find out, compile and run it.
The robot has run out of beepers so it can’t put down any when it is told to - another run-time error. To generalise, run-time errors occur when a legal command can’t be completed. So if you tell the robot to move when it’s facing a wall, the move command can’t be completed. If you tell the robot to pick up a beeper but there isn’t one available at its current location, then the pick up command can’t be completed.
Some tasks for you
Getting a different view
What would you need to change in Example01 to hide the robot world and only make the trace window visible? Try it and see if you’re right. Is it possible to make the program work with no output at all?
Extending the robot task
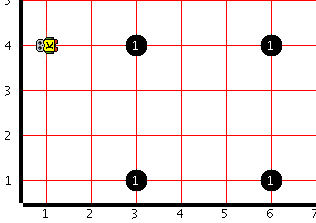
In the Example01 program the robot places beepers on three corners of a square. Adjust the program so that the robot marks all four corners of the square with beepers:
Figure 6 - Your first task.
A possible solution for this task is available for download.
A harder task
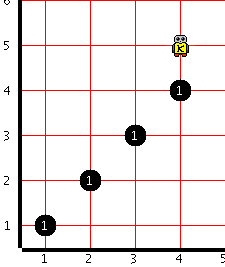
Adjust the Example01 program so that the robot makes a diagonal line of beepers that starts at the corner of 1st Avenue and 1st Street and ends at the corner of 4th Avenue and 4th Street.
Tip
To do this the robot will need to turn both left and right but robots have no turnRight() command. What happens if you get the robot to turnLeft() more than once?
Figure 7 - A harder task.
A possible solution for this task is available for download.
Wrap up
This article:
- introduced Karel J. Robot and the robot world
- outlined the four abilities of robots: move(), turnLeft(), putBeeper(), and pickBeeper()
- showed how to program a task for the robot to perform
- showed how to compile and run a robot program
- explained the difference between syntax errors and run-time errors
In the next installment, we will cover how to teach new commands to the robot.
First published: PC Update Oct 2003 (online version updated)
December 12th, 2008 at 12:09 am
Hi. Has any of this been updated to Java 1.5 or higher? It’s such a shame that this big effort might not be usable ( Some of Sun’s older tutorials won’t run/compile on newer runtimes ). It looks like a good learning tool.
December 12th, 2008 at 8:17 am
I learned the basics of coding with Karel the Robot a few years back. This program is the one of the best teaching tools for coding. I am currently using it to teach my little brother (15) how to read and write basic code. A job that karel the Robot has made in my brothers words “Way Cool”. So I do hope that as tecnology changes that they will update Karels progam.
March 1st, 2010 at 11:48 am
hi i have a problem in how to do karel move backward but i can’t do it if you can give me some help i will apreciate